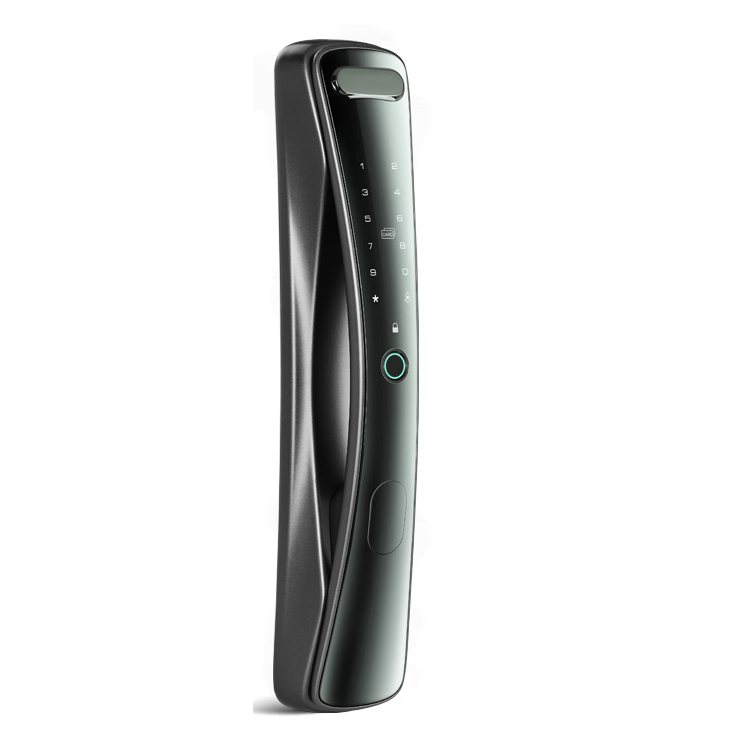
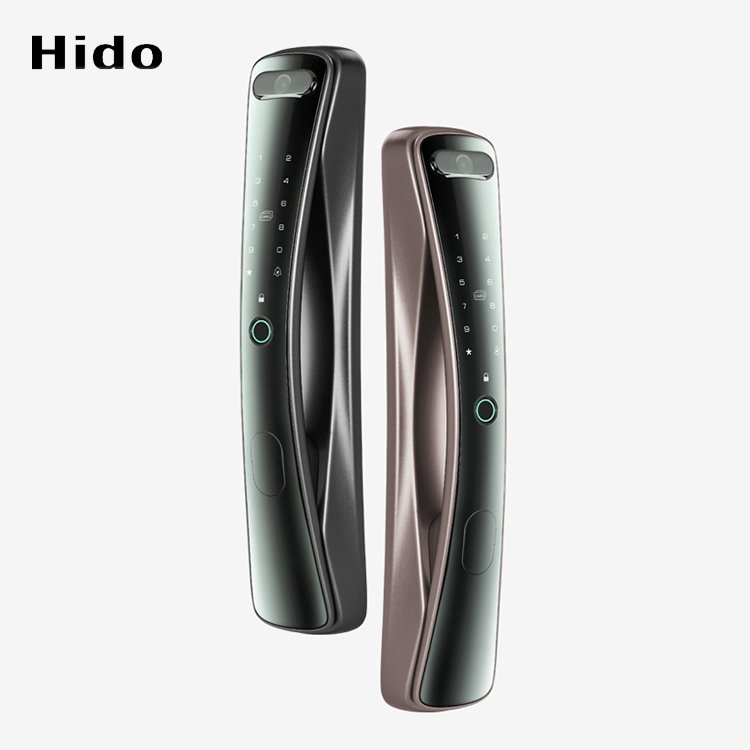
Super Lowest Price Smart Door Lock Face Recognition - HD-8904 Bluetooth/Wifi Rim Smart Door Lock – Botin
Super Lowest Price Smart Door Lock Face Recognition - HD-8904 Bluetooth/Wifi Rim Smart Door Lock – Botin Detail:
Overview
Quick Details
Door Type: Wood door, Steel door, Stainless Steel door, Aluminum door, Brass door
Place of Origin: Guangdong, China
Brand Name: Hido
Model Number: HD-8904 TUYA
Data Storage Options: Cloud
Network: wifi
Color: Piano Black
Material: Aluminum alloy
Style: Rim Lock waterproof tuya app
Product size: 156mm*59mm
Support Phone System: iOS 7.0 or Android 4.4 or above
Power supply: DC 6V (4*AA Batteries)
Suitable for door standard: 30-110mm(Thickness)
Warranty: One Year
Unlock Methods: Card+Fingerprint+Password+Mechanical key+APP
Certification: CE, ROHS
Packaging & Delivery
Selling Units: Single item
Single package size: 25.5X19X84 cm
Single gross weight: 2.000 kg
Package Type: Standard export packing, color Box
Description
| Door Type | Wood door, Steel door, Stainless Steel door, Aluminum door, Brass door |
| Model Number | HD-8904 TUYA |
| Data Storage Options | Cloud |
| Network | wifi |
| Color | Piano Black |
| Material | Aluminum alloy |
| Style | Rim Lock waterproof tuya app |
| Product size | 156mm*59mm |
| Support Phone System | iOS 7.0 or Android 4.4 or above |
| Power supply | DC 6V (4*AA Batteries) |
| Suitable for door standard | 30-110mm(Thickness) |
| Warranty | One Year |
| Unlock Methods | Card+Fingerprint+Password+Mechanical key+APP |
| Certification | CE, ROHS |
Product Detail
Fingerprint Reader
Touch Keypad
Tuya System Module
Card Reading Area
Cylinder Hole
Usb Charging Port
Manual Knob
Battery Box
Suitable for Multiple Door
Universal Right Push / Right Pull & Left Push / Left Pull
Wooden Door
Metal Door
Unlock Remotely
Press the ” 9+# ” Button on the Lock. then Your App Will Receives a Permission Message, Click to Unlock Remotely
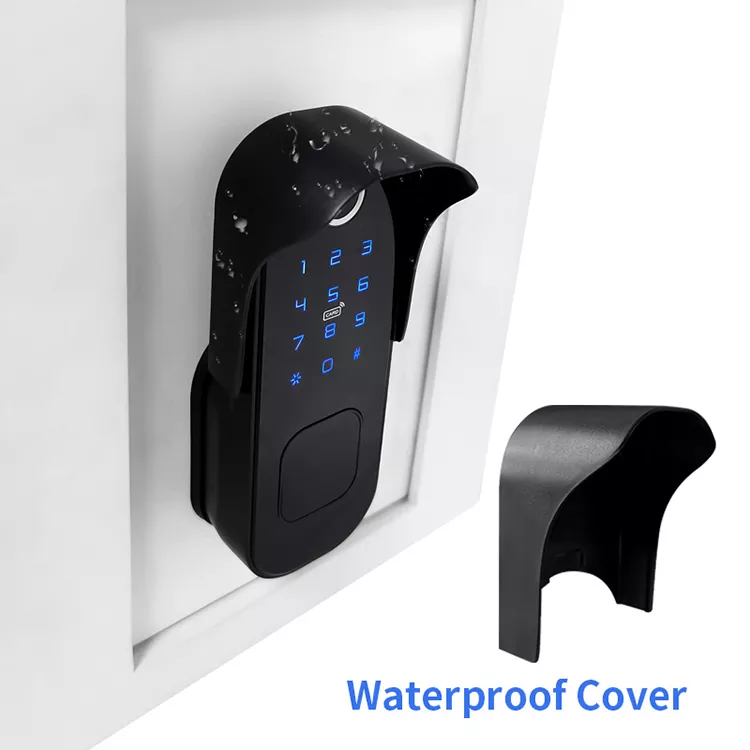
Waterproof Cover
Five Unlocking Modes
For All Your Family Memebers
Unlocking Via Fingerprint
Unlocking Via App
Unlocking Via Passcode
Unlocking Via Ic Card
Unlocking Via Mechanical Key
Emergency Power Supply
Low Battery Alarm
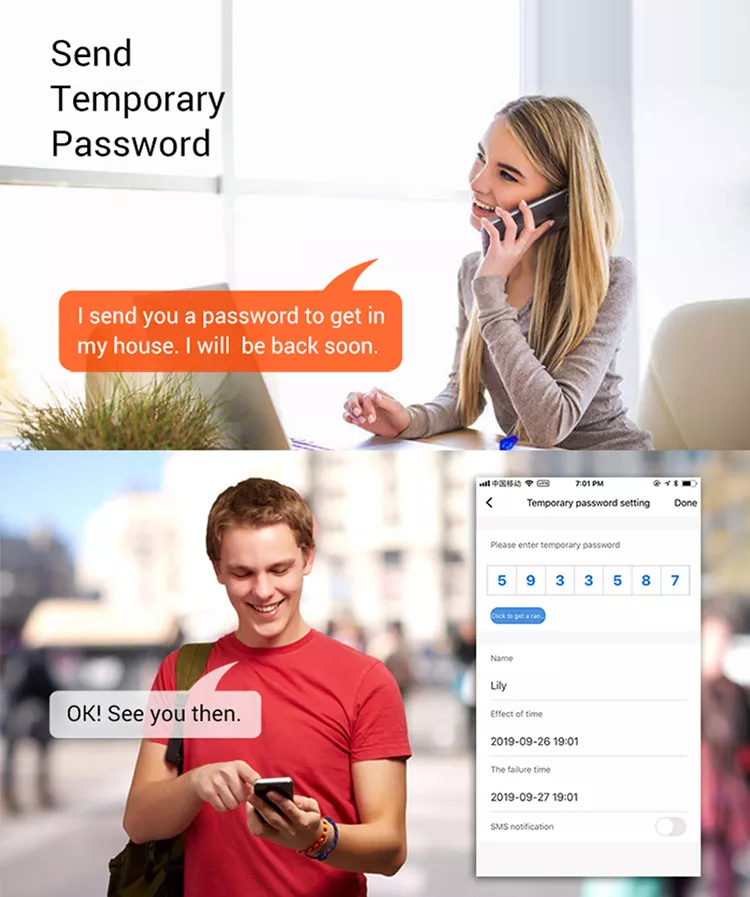
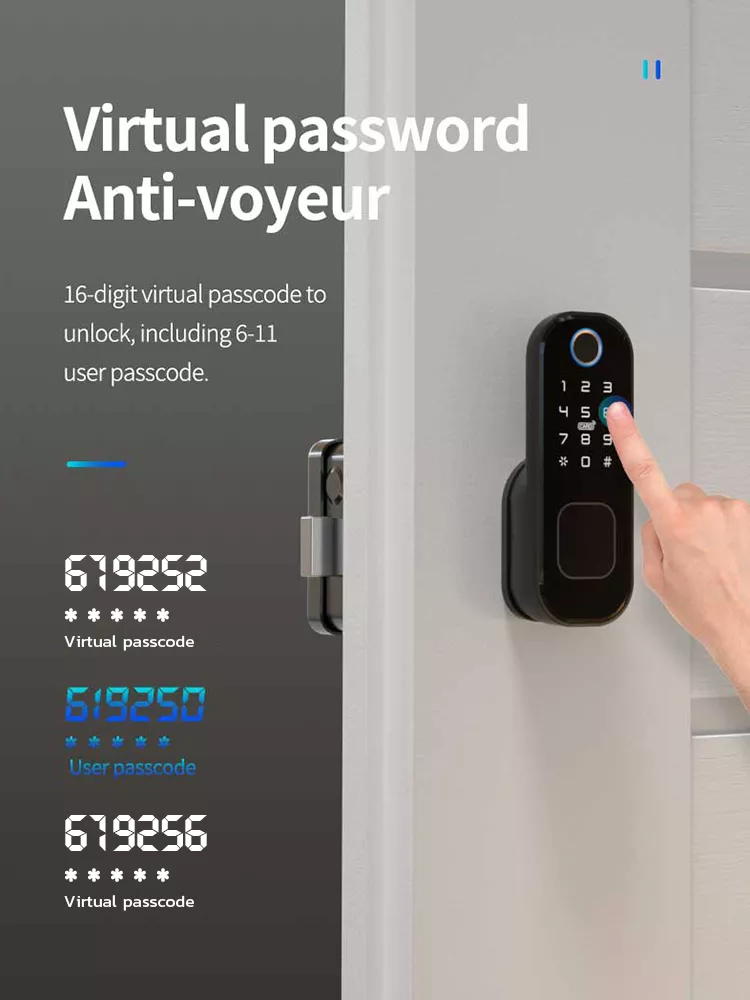
Virtual Password
Anti-voyeur
16- Digit Virtual Passcode to Unlock, Including6-11 User Passcode.
8904t remote control
Apartment Smart Lock User Manual

Please read the manual carefully before use
Note:
* Please carry the mechanical key with you or put it in an
outdoor safe place for any emergency use.
* Do not install this lock in a fire exit door.
1)Before installation
1.1)Professional installation is recommended.
1.2)To avoid any circuit function fault, please do not crumple the cable.
1.3)Keep the door open until finishing the installation and lock function test.
1.4)Please check whether fingerprint, card, password, key, inside knob unlock function well after installation (under initial status, any fingerprint, IC card or 4 digit password is able to unlock).
1.5)If any function mentioned above doesn’t work appropriately, check again if the cable is well connected or if there any improper operation during installation then reinstall it strictly following our diagram.
2) Installation diagram

Steps:
2.1) Open the front panel and insert the lock cylinder (refer to diagram 7,8).
2.2) As shown in the diagram, use the studs to connect the front panel and cylinder panel then tighten the screws to fix (refer to diagram 4,5,6).
2.3) Fix the rim mortise on the door then cover it with the back panel and fix it (refer to diagram 1,2,3).
3) Buckle installation

Steps:
3.1)Use the screws to fix the buckle plate on the door.
3.2)Use screws to fix the buckle.
3.3)When finish the installation, test the knob of the rim lock making sure the deadbolt fit the buckle slot well. If the unlock operation is not smooth enough, try adjusting the buckle position.
4)Function and operation
4.1) Keypad function description
4.1.1) Administrator information: refer to fingerprint, password or IC card administrator.
4.1.2) unlock information: refer to the registered fingerprint, password or IC card information (including the administrator and user).
4.1.3) “*” key: delete / back key. Enter “*” to delete the input password. Three consecutive “*” operation will clean up all the input information.
4.1.4) “#” key: operation confirm key / menu function key.
4.2) factory initial status
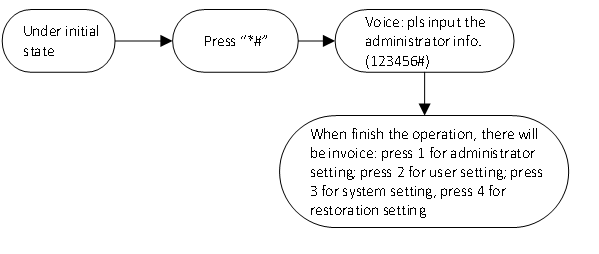
4.2.1) Factory initial password is 123456#. All fingerprints, IC card or 4 digits password is able to unlock under factory initial status.
4.2.2) When finish administrator registration, unregistered fingerprint, IC card or password will fail to unlock.
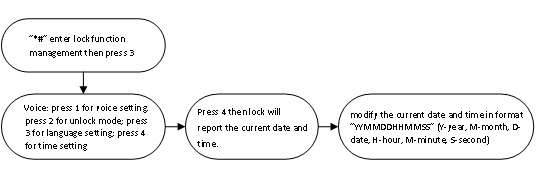
4.3) Lock function management menu
4.4) administrator setting
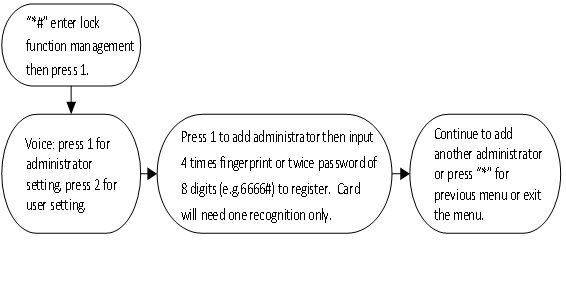
4.4.1) Add administrator information
4.4.2) Delete administrator information

4.5) User setting
4.5.1) Add user information
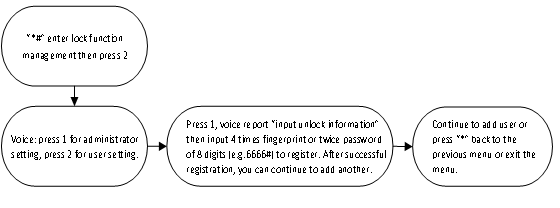
4.5.2) Delete user information

4.6) System setting
4.6.1) Voice setting
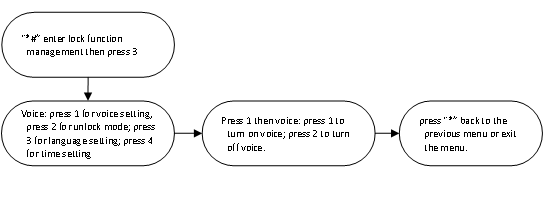
4.6.2) Unlock mode setting
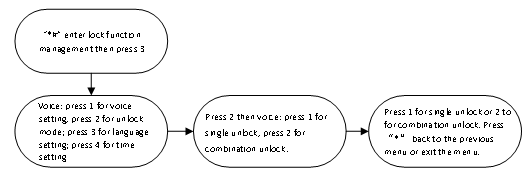
4.6.3) Language setting
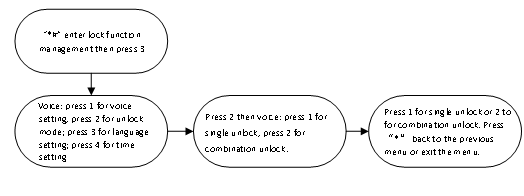
4.6.4) Time setting
4.6.5) Reset to factory status

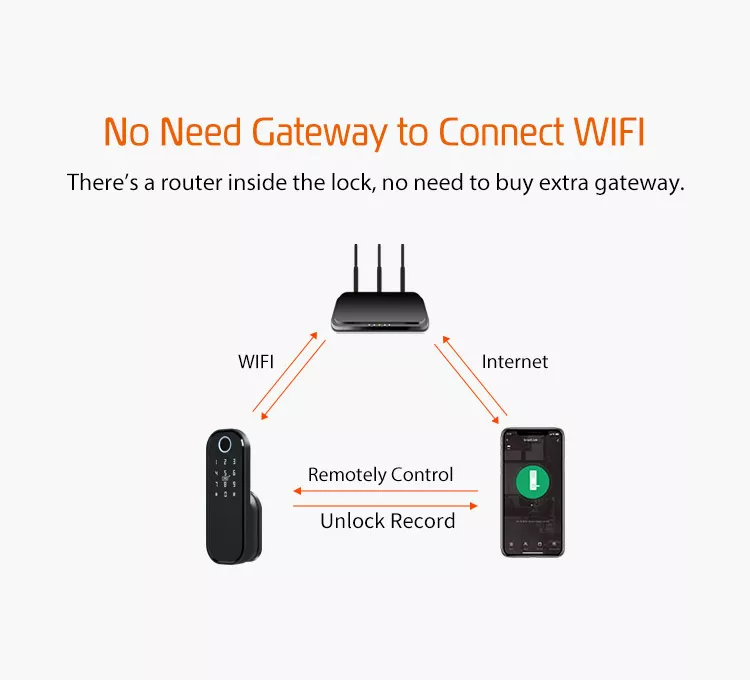
5) APP setting( Tuya Wi-Fi APP, support 2.4GHz only)
5.1) add administrator (skip this operation if you have done this)
5.2) Search “Tuya Smart” in the APP store or other APP market to download it.
5.3) Register by mobile phone number then log in.
5.4) Find in Tuya APP the “security and sensor” and press “door lock (Wi-Fi)”and
follow the instruction to finish adding lock.
5.5) Net connecting
5.6) Entering Wi-Fi setting menu
1. Press “*#” to verify the administrator information.
2. Press 1 to enter administrator setting menu
3. Press 3 to finish the Wi-Fi setting.
5.7) Voice reports press 1 for hotpot connection (screen indicator light flashes slowly); press 2 for intelligent connection (screen indicator light flashes rapidly). Intelligent connection is recommended.
5.7.1) Hotpot connection operation
1. Enter Wi-Fi connection menu then press 1 to choose hotspot connection.
2. Choose the Wi-Fi hotpot to be connected to then input the right password.
3. Press “Next” then it will inform you “successful”. If it failed, it will report “failed”. Please try again the operation.
5.7.2) Intelligent connection operation
1. Enter Wi-Fi connection menu then press 2 to choose intelligent connection.
2. Choose the Wi-Fi to be connected to then input the right password.
3. Press “Next” then it will inform you “successful”. If it failed, it will report “failed”. Please try again the operation.
5.8) Keypad screen number 1234 will flash successively with voice “successful” when finish adding operation; if time out, voice will report “fail”.
5.9) Remote unlock: wake the keypad and press “9#” then voice will report “requesting remote unlocking”. Door lock time will be corrected while requesting remote unlocking.
6) Remote control
6.1) Add administrator (skip this operation if you have done this)
6.2) Entering Wi-Fi setting menu
1. Press “*#” to verify the administrator information.
2. Press 2 to enter user setting menu.
3. Press 1 then press any key on the remote control when hear the voice instruction.
7) Other description
- 5 times wrong password input will cause a 30 seconds keypad lock. During these 30 seconds, lock will not respond to any operation.
- Anti-peeping password function: unlock by inputting before or after the correct password some random number (no more than 16 bits) then end by # key.
- The lock will give out warning alarm every unlock operation when voltage is lower than 4.8V. Please replace the battery as soon as possible.
- Reset operation: Press “SET” on the back panel for 6 seconds (screen number 654321 will automatically flash successively. The initial password will be 123456.
- Under factory initial status, you can swift the language between Chinese and English by inputting 333666999#.
8) Technical Parameter
|
Technical Parameter |
|||
|
|
Item |
Parameter |
Remark |
|
1 |
Quiescent current |
≦50uA |
|
|
2 |
Dynamic current |
≦180mA |
|
|
3 |
Administrator capacity |
9 |
|
|
4 |
Fingerprint capacity |
100 |
|
|
5 |
FP+PWD+ card capacity |
300 |
|
|
6 |
Fingerprint scanner |
Semi-conductor |
|
|
7 |
fingerprint recognition |
≦1s |
|
|
8 |
FP recognition angle |
360 degree |
|
|
9 |
False rejection rate |
≦0.1% |
|
|
10 |
False recognition rate |
≦0.0001% |
|
|
11 |
Acting time |
≦0.5s |
|
|
12 |
Power |
DC 6V |
|
|
13 |
Emergency power |
DC 5V |
|
|
14 |
Working temperature |
-25℃~60℃ |
|
|
15 |
Working relative humidity |
20%~90%RH |
|
|
16 |
Human voice |
YES |
|
|
17 |
Keypad |
12 digits touching keypad |
|
|
18 |
Password length |
4-8 digits |
|
|
19 |
Virtual password |
32 digits |
|
|
20 |
Low power warning |
4.8±0.2V |
|
|
21 |
unlock time |
≦1s |
|




Product detail pictures:


Related Product Guide:
We not only will try our best to offer excellent services to every customer, but also are ready to receive any suggestion offered by our customers for Super Lowest Price Smart Door Lock Face Recognition - HD-8904 Bluetooth/Wifi Rim Smart Door Lock – Botin , The product will supply to all over the world, such as: Birmingham, Thailand, Kuwait, The working experience in the field has helped us forged a strong relations with customers and partners both in domestic and international market. For years, our products and solutions have been exported to more than 15 countries in the world and have been widely used by customers.
Company director has very rich management experience and strict attitude, sales staff are warm and cheerful, technical staff are professional and responsible,so we have no worry about product,a nice manufacturer.

